Gmail Alert using IOT - Esp8266
- Ankita Sharma
- Aug 26, 2020
- 4 min read

Updated: Sep 26, 2024
The Internet of Things ( IoT) aims towards making life simpler by automating every small task around us. Alerts play an important role in IoT developments to notify the user about something important. It can be either in the form of Gmail notifications, LED indication / SMS alerts, or any other form.
In this article, we will learn How to get Gmail notifications using NodeMCU Esp8266. The simplest method to send and receive Gmail alerts from an ESP8266 WiFi module is by using the Blynk app.
Hardware Components :
1. Breadboard

They are basically a construction base used for prototyping electronic circuits. Breadboards allow us to make quick connections between hardware components, without soldering.
Buy Breadboard from here.
2. Esp8266 NodeMCU

It is an open-source development board specially targeted for IoT developments. It is having integrated support for WiFi connection. Also, it is very cost-efficient as well as consumes less power. It allows us to use it as a micro-controller and manipulate input and output.
Buy Esp8266 from here.
3. Ultrasonic Sensor HC-SR04

The sensor contains an eye-like structure that acts as a transmitter (T) and receiver (R). The Ultrasonic transmitter transmits an ultrasonic wave that travels in the air and gets reflected towards the Ultrasonic receiver module.
It works with the basic formula for calculating distance in terms of speed and time i.e. ( Distance = Speed × Time ). Here, the time of flight includes the distance traveled back and forth, so we need to divide the time of flight by 2 while calculating the distance. Thus, D = S x T/2 where T is the time taken for the waves to hit the object and reflect. It consists of 4 pins: Vcc ( Power supply ), Trigger ( input pin ), Echo( output pin ), GND (ground).
Buy HC-SR04 Sensor from here.
4. Jumper Wires

Jumper wires are the connecting wires that have connector pins at each end, allowing them to be used to connect the two points without soldering. They typically come in three versions - male-to-male, male-to-female, and female-to-female. Here, we will be using male-to-male jumper wires to interface Ultrasonic Sensor with NodeMCU.
Buy Jumper Wires from here.
Softwares :
1. Arduino IDE
Arduino Integrated Development Environment is open-source software that facilitates the development and uploading of codes to the microcontroller. Program written in Arduino IDE is called Sketch. These Sketch files are saved with the file extension ino.
Click on the link to download the software
2. Blynk App
Blynk is an IoT platform that allows you to quickly build user interfaces for controlling and monitoring your hardware projects from your android phones.
Circuit Connections :
Here, connections are pretty simple. The four pins ( VCC, GND, trigger, echo ) of HC SR 04 #Ultrasonic Sensor is connected as mentioned below -
The VCC pin of HC SR 04 is connected to the VCC pin of Esp8266.
GND pin of HC SR 04 is connected to the GND pin of Esp8266.
The trigger pin of HC SR 04 is connected to the D1 pin of Esp8266.
Echo pin of HC SR 04 is connected to the D2 pin of Esp8266.
Blynk App settings :
1. Create a new project.

2. Name your project ( say Gmail ) then select the hardware device ( #NodeMCU in this case ). Here we will be using a WiFi network, so choose the connection type as Wi-Fi
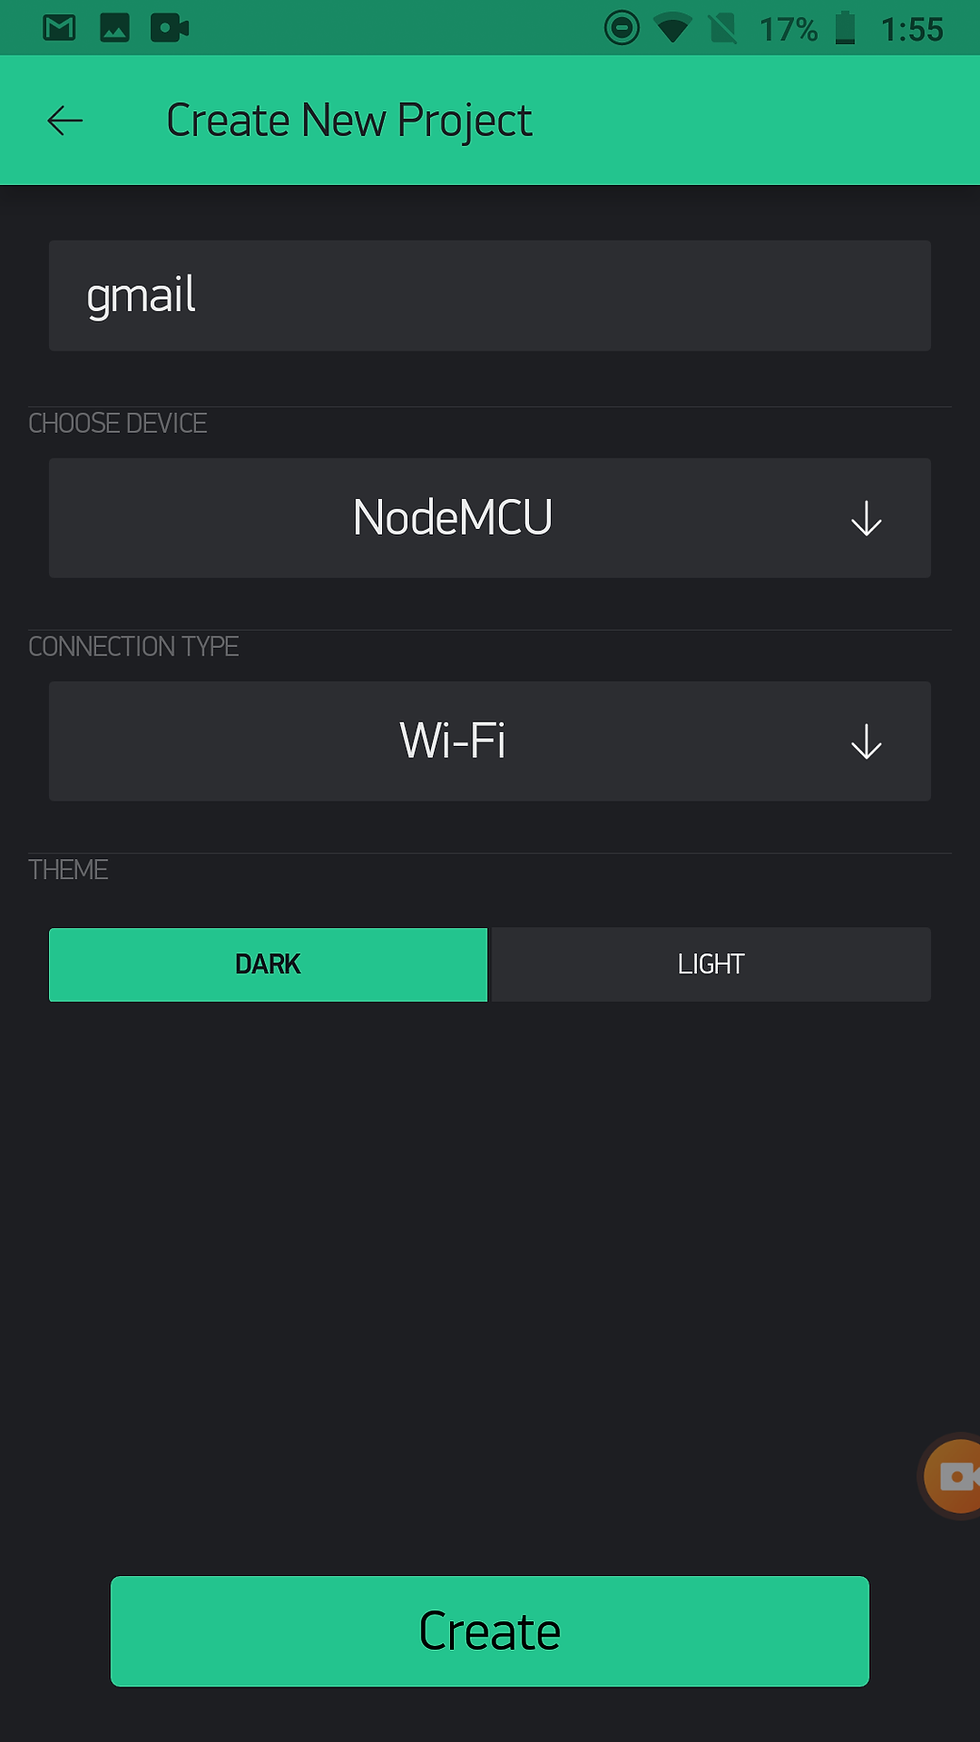
Now, click on Create, you will get an authentication token to your id.
3. Go to Widget Box by clicking on the top right corner, Now select gauge settings to measure the distance from the Ultrasonic #Sensor.

Name your gauge as Distance and then select V5 pin as an input pin. Give Label as cm.
4. Now go to notifications and select #gmail.

5. Go to Email settings and check your mail-id.

Code :
Note:
Do not forget to change the file extension to .ino(Arduino IDE) file format before you upload the code to #ESP8266 Board.
Change the auth[ ], ssid[ ], pass[ ] as authentication token (received on mail), Wi-Fi Username and Wi-Fi password respectively.
Replace the Blynk. email function parameter in the code with your email id.
Also, you need to install the Esp8266 library and BlynkSimpleEsp8266 library in Arduino IDE before uploading the code to NodeMCU.
For installing Esp8266 : Go to Tools > Board > Boards Manager > Esp8266 > Click on install .
For installing Blynk library: Go to Sketch > Include libraries > Manage libraries > Search for Blynk and press ENTER > Click on install.
Once the hardware connections are completed and the code is written, connect NodeMCU to the system and insert the code. Now, Run the code.
Working :
Check the Project working video here - Gmail Alert using Esp8266 | ESP8266 Email Notification using Blynk | Get ESP8266 Email Notification
Video By - Abhishek Goud
Conclusion :
This article gives an overview of #interfacing NodeMCU with an Ultrasonic sensor to get Gmail alerts, depending on the distance measured. This kind of interfacing can be used in many IoT projects and developments including Water level indicator systems, and Smart Containers.
See also
Order Electronics Projects
Want us to guide you through your project or make the project for you? Click on the button below or reach out to us via Call/WhatsApp at (+91) - 7600948607
You can -
Order Basic Electronics Projects
Order Embedded Systems Projects
Order IoT Projects
Order FPGA Projects
Order VLSI Projects
Order Image Processing Projects
Order Matlab Projects
Order TinkerCAD Projects
Order Proteus Projects
Click on the button below to fill out the project inquiry form -
Create Various Projects
Check out our Free Arduino Projects Playlist - Arduino Projects
Check out our Free Raspberry Pi Projects Playlist - Raspberry Pi Projects
Check out our Free TinkerCAD Projects Playlist - TinkerCAD Projects
Check out our Free IoT Projects Playlist - IoT Projects
Check out our Free Home Automation Projects Playlist - Home Automation Projects
Check out our Free NodeMCu Projects Playlist - NodeMCu Projects
Follow us -
Please do follow us i.e. #learnelectronicsindia to get daily updates about new blogs, videos, courses, products, offers, competitions, quizzes, and Internship Opportunities.
😍 I can't thank Learn Electronics India enough for this brilliant blog. The attention to detail and the vivid explanations truly set it apart. Creating a Gmail Alert system using the ESP8266 has been a dream of mine, and this article made it a reality. Highly recommended for electronics enthusiasts.
Short and effective! LearnElectronics India never disappoints.