IR decoder with Arduino
- Nagashree R Nadig
- Aug 27, 2021
- 4 min read

Updated: Sep 15, 2024
In this article, you will learn to design an #IRdecoder using Arduino.
Hardware Components - IR decoder with Arduino|
1. Breadboard:
A breadboard is a simple rectangular board that has many holes shorted in a specific manner. It is the construction base for implementing electronic projects. The holes are used to connect circuit components like ICs, capacitors, potentiometers.

2. Arduino Uno:
It is an open-source microcontroller board that can be programmed according to user requirements. #ArduinoUno board is used for interfacing the input-output elements to construct a project.

3.TSOP1738 IR receiver:
The TSOP1738 is the most common IR receiver used in the IR remote control systems. The epoxy package acts as the IR filter. It encloses the pin diode and the preamplifier which are assembled on the lead frame. #TSOP1738 receives an IR signal at 38kHz frequency.

3.Remote:
The remote or remote control is the wireless device used to control another device from a distance. Each key in the remote will transmit an IR pulse that is unique to that button. Here, in this project, the remote key values are decoded by the IR decoder we design.

4.LED:
Light Emitting Diode (LED) is a semiconductor device that emits light when the current flows through it. The color of the light emitted by the LED depends on the bandgap the electrons need to cross to recombine with the holes in the semiconductor.

5. Resistor-220Ω:
The resistor is a passive electronic component that offers resistance to the current flowing through it. Here it is used to reduce the current flowing through the LED. A 220Ω resistor is used in this project.

6. Jumper Wires:
Jumper wires have connectors and pins that are used to connect different components on a breadboard.

Circuit Connections:
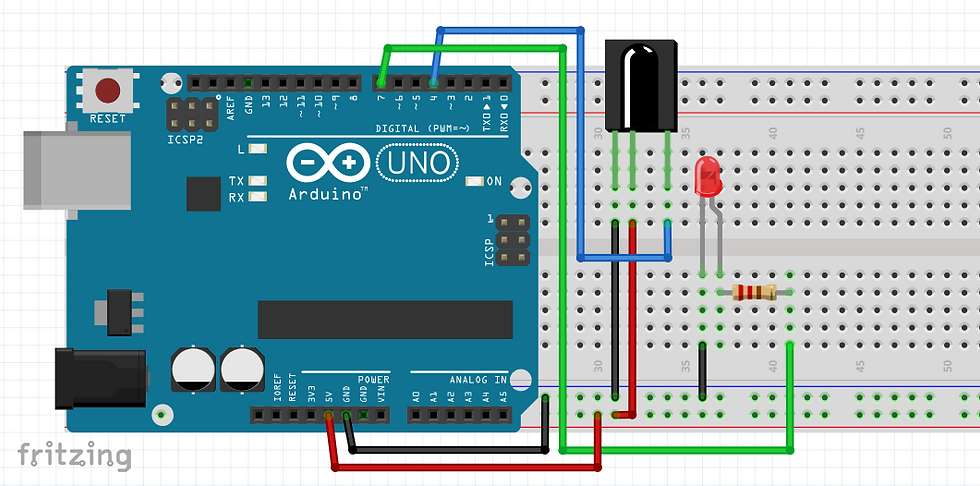
Connect the first pin of the IR receiver to the ground of the Arduino via a breadboard.
Connect the second pin of the IR receiver to the 5V of the Arduino via a breadboard.
Connect the third pin of the IR receiver to D4 of the Arduino.
Connect the cathode of the LED to the ground of the Arduino via breadboard and connect the anode to one of the legs of the 220Ω resistor.
Connect the other leg of the resistor to D7 of the Arduino board.
Code:
Install the "IRremote" library by the shirriff in your Arduino IDE.
In the code, first, include the "IRremote" library.
Define the D4 AND D7 pins as the parameters "decoder_pin 4" and "led_pin 7".
Then declare a variable "decoder_value" to hold the decoder value.
Create an object- "IRrecv" and pass decoder_pin as a parameter to it.
Create another object- "decode_results" and pass the result as a parameter to it.
In void setup(), start the serial monitor output with the baud rate of 9600, begin enableIRIn() and set the pin mode for the LED as output.
In the void loop(), set the "irrecv" to receive the value to be decoded.
Set the LED value as High for the decoded value of the remote key "1" and set LED value as Low for the decoded value of the remote key "0".
Provide a suitable delay for the loop.
With irrecv.resume(), a new value can be taken by the IR receiver to decode it.
Working:
The IR decoder receives the IR source from the remote and decodes its value. This is converted to the visible format using an Arduino library and the decoded key values are distinguished by setting different values for the LED output.
When the "1" button of the remote control is pressed, the LED glows as it is set to high for the condition. IR decoder with Arduino

When the "0" button of the remote control is pressed, the LED turns off as it is set as Low for the condition.

Written by-
Name- Nagashree R Nadig
Portfolio Link- https://www.learnelectronicsindia.com/team/nagashree-r-nadig
See also-


Check out our Free Arduino Projects Playlist - Arduino Projects
Check out our Free Raspberry Pi Projects Playlist - Raspberry Pi Projects
Check out our Free TinkerCAD Projects Playlist - TinkerCAD Projects
Check out our Free IoT Projects Playlist - IoT Projects
Check out our Free Home Automation Projects Playlist - Home Automation Projects
Check out our Free NodeMCu Projects Playlist - NodeMCu Projects
Order Electronics Projects
Want us to guide you through your project or make the project for you? Click on the button below or reach out to us via Call/WhatsApp at (+91) - 7600948607
You can -
Order Basic Electronics Projects
Order Embedded Systems Projects
Order IoT Projects
Order FPGA Projects
Order VLSI Projects
Order Image Processing Projects
Order Matlab Projects
Order TinkerCAD Projects
Order Proteus Projects
Click on the button below to fill out the project inquiry form -
Create Various Projects
Check out our Free Arduino Projects Playlist - Arduino Projects
Check out our Free Raspberry Pi Projects Playlist - Raspberry Pi Projects
Check out our Free TinkerCAD Projects Playlist - TinkerCAD Projects
Check out our Free IoT Projects Playlist - IoT Projects
Check out our Free Home Automation Projects Playlist - Home Automation Projects
Check out our Free NodeMCu Projects Playlist - NodeMCu Projects
Follow us -
Please do follow us i.e. #learnelectronicsindia to get daily updates about new blogs, videos, courses, products, offers, competitions, quizzes, and Internship Opportunities.
Informative and concise! LearnElectronics India always delivers quality content.
Learn Electronics India has done an exceptional job with this blog/article on IR decoding with Arduino. The explanations are concise yet comprehensive, making it accessible to readers of all levels. I'm grateful for the insights gained from this piece and look forward to more engaging content from the author.