traffic light system study | using the Arduino |
- Nagashree R Nadig
- Sep 30, 2021
- 3 min read

Updated: Sep 15, 2024
In this article, you will learn to design a #trafficlight system using the Arduino.
Hardware Components - traffic light system study|
1. Arduino Uno:
It is an open-source microcontroller board that can be programmed according to user requirements. #ArduinoUno board is used for interfacing the input-output elements to construct a project.
What is Arduino? | traffic light system study|

2. Resistors- 220Ω and 1000Ω:
The resistor is a passive electronic component that offers resistance to the current flowing through it. Here it is used to reduce the current flowing through the LED and the push button. 220Ω and 1000Ω resistors are used in this project.

3. LED:
Light Emitting Diode (LED) is a semiconductor device that emits light when the current flows through it. The color of the light emitted by the LED depends on the bandgap the electrons need to cross to recombine with the holes in the semiconductor. Green, yellow and red LEDs are used in this project.

4. Push Button:
A push-button is typically a switch that is used to control certain parameters of the project.

Circuit Connections:
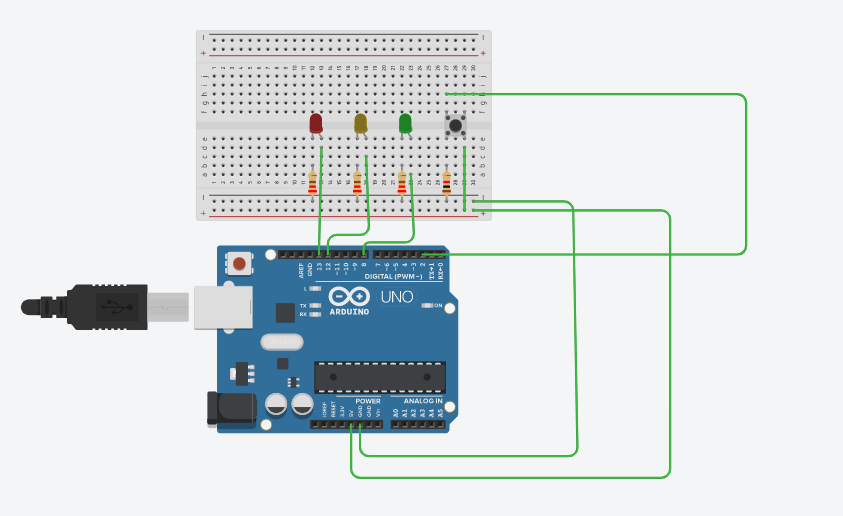
Connect 5V of the Arduino to the positive rail of the breadboard and connect the ground of the Arduino to the negative rail of the breadboard.
Connect the cathode of the red LED to a 220Ω resistor which is in turn connected to the ground rail. Connect the anode of the red LED to the D13 of the Arduino board.
Connect the cathode of the yellow LED to a 220Ω resistor which is in turn connected to the ground rail. Connect the anode of the yellow LED to the D12 of the Arduino board.
Connect the cathode of the green LED to a 220Ω resistor which is in turn connected to the ground rail. Connect the anode of the green LED to the D8 of the Arduino board.
Connect 1a terminal of the push-button to a 1000Ω resistor which is in turn connected to the ground. Connect 2a terminal of the push button to the positive rail of the breadboard.
Connect 1b terminal of the push-button to D2 of the Arduino.
Code:
Declare and initialize all the variables used in the code.
In void setup(), set the pin-modes for the pins used on the Arduino board and start the serial monitor output with a 9600 baud rate.
In void loop(), read the value of the buttonPin using digitalRead() function.
Using if condition, for the (buttonState==1), set the red, yellow, and green LED to glow in order by providing an appropriate delay time.
Print the instructions for each LED output on the serial monitor.
Working:
The red, yellow, and green LEDs will blink in an order with the delay provided in the code when the button is pushed. The resistors connected to the LEDs and the push-button will reduce the flow of the current through them. In the following pictures, you can see the working of the traffic light model rigged up using an Arduino board.


Video by- Diksha R
Check the Project working video here - Traffic Light Demo
Written by-
Name- Nagashree R Nadig
Portfolio Link- https://www.learnelectronicsindia.com/team/nagashree-r-nadig
See also:


Check out our Free Arduino Projects Playlist - Arduino Projects
Check out our Free Raspberry Pi Projects Playlist - Raspberry Pi Projects
Check out our Free TinkerCAD Projects Playlist - TinkerCAD Projects
Check out our Free IoT Projects Playlist - IoT Projects
Check out our Free Home Automation Projects Playlist - Home Automation Projects
Check out our Free NodeMCu Projects Playlist - NodeMCu Projects
Order Electronics Projects
Want us to guide you through your project or make the project for you? Click on the button below or reach out to us via Call/WhatsApp at (+91) - 7600948607
You can -
Order Basic Electronics Projects
Order Embedded Systems Projects
Order IoT Projects
Order FPGA Projects
Order VLSI Projects
Order Image Processing Projects
Order Matlab Projects
Order TinkerCAD Projects
Order Proteus Projects
Click on the button below to fill out the project inquiry form -
Create Various Projects
Check out our Free Arduino Projects Playlist - Arduino Projects
Check out our Free Raspberry Pi Projects Playlist - Raspberry Pi Projects
Check out our Free TinkerCAD Projects Playlist - TinkerCAD Projects
Check out our Free IoT Projects Playlist - IoT Projects
Check out our Free Home Automation Projects Playlist - Home Automation Projects
Check out our Free NodeMCu Projects Playlist - NodeMCu Projects
Follow us -
Please do follow us i.e. #learnelectronicsindia to get daily updates about new blogs, videos, courses, products, offers, competitions, quizzes, and Internship Opportunities.
Informative and concise! LearnElectronics India always delivers quality content.
This blog/article on the traffic light system study using Arduino by Learn Electronics India is absolutely fantastic! It provided me with a comprehensive understanding of how to implement this project. Thank you for the detailed explanation and step-by-step instructions.