


LCD Endless Runner Game Using Arduino UNO
Introduction
Interactive games are an excellent way to learn embedded systems and microcontroller programming because they combine hardware interfacing, user input handling, display control, and programming logic into a single project. Even a simple game can demonstrate important concepts such as digital input processing, custom character creation, random event generation, and real-time display updates.
Arduino UNO provides an easy and flexible platform for developing such interactive applications due to its simple programming environment and extensive library support. By interfacing a 16×2 LCD display with push buttons, beginners can create engaging projects while learning the fundamentals of embedded system design.
In this project, an Arduino UNO is used to develop a simple LCD-based endless runner game. The player controls a custom character using two push buttons to move between the upper and lower rows of the LCD while avoiding randomly generated obstacles. Each successfully avoided obstacle increases the player's score and gradually increases the game's difficulty by making the obstacles move faster. If the player collides with an obstacle, the game displays a Game Over message, shows the final score, and automatically restarts.
This project demonstrates several important embedded system concepts, including LCD interfacing in 4-bit mode, digital input handling using internal pull-up resistors, custom LCD character creation, random obstacle generation, collision detection, score tracking, and game state management. It provides an enjoyable and practical way to understand how hardware and software work together to create an interactive embedded application.
What You'll Learn
By completing this project, you will learn:
How to interface a 16×2 LCD with an Arduino UNO using the LiquidCrystal library.
How to create and display custom LCD characters for the player and obstacles.
How to use push buttons with INPUT_PULLUP mode to detect user inputs reliably.
How to generate random obstacles using Arduino's random() and randomSeed() functions.
How to implement collision detection by comparing the positions of the player and obstacle.
How to develop a simple endless runner game using real-time programming techniques.
How to manage score tracking, game speed, and automatic game restart after a collision.
Components Required
The following components are required to build this Arduino-based LCD Endless Runner Game:
Component | Quantity | Purpose |
Arduino UNO | 1 | Controls the entire game logic, processes button inputs, and updates the LCD display. |
16×2 LCD Display | 1 | Displays the player, obstacles, score, and game messages such as "Welcome!" and "Game Over." |
Push Buttons | 2 | Allow the player to move the character between the upper and lower rows. |
1 kΩ Resistor | 1 | Limits the current supplied to the LCD backlight, protecting it from excessive current. |
Breadboard | 1 | Provides a platform for assembling the circuit without soldering. |
Jumper Wires | As Required | Connect the Arduino with the LCD, buttons, and other components. |
USB Cable | 1 | Powers the Arduino and uploads the program from the computer. |
Project Overview
The LCD Endless Runner Game is an interactive Arduino-based project that demonstrates the fundamentals of embedded systems through a simple two-dimensional game. The game is displayed on a 16×2 LCD, where the player controls a custom character using two push buttons to avoid incoming obstacles. The objective is to survive for as long as possible by moving between the upper and lower rows of the LCD without colliding with the obstacles.
When the Arduino is powered on, the LCD displays a welcome message before starting the game. The player begins at the left side of the display, while an obstacle is generated at the far-right side in a randomly selected row. As the game progresses, the obstacle continuously moves from right to left. The player can press the UP or DOWN button to change rows and avoid the obstacle.

Each obstacle successfully avoided increases the player's score and gradually increases the game's difficulty by reducing the delay between obstacle movements, causing the obstacles to move faster. If the player and obstacle occupy the same row and column, the game detects a collision, displays a "Game Over" message along with the final score, and then automatically restarts the game.
This project combines LCD interfacing, push-button input handling, custom character generation, random number generation, collision detection, score management, and game logic into a single embedded system application, making it an excellent learning project for beginners in Arduino programming.
Circuit Diagram
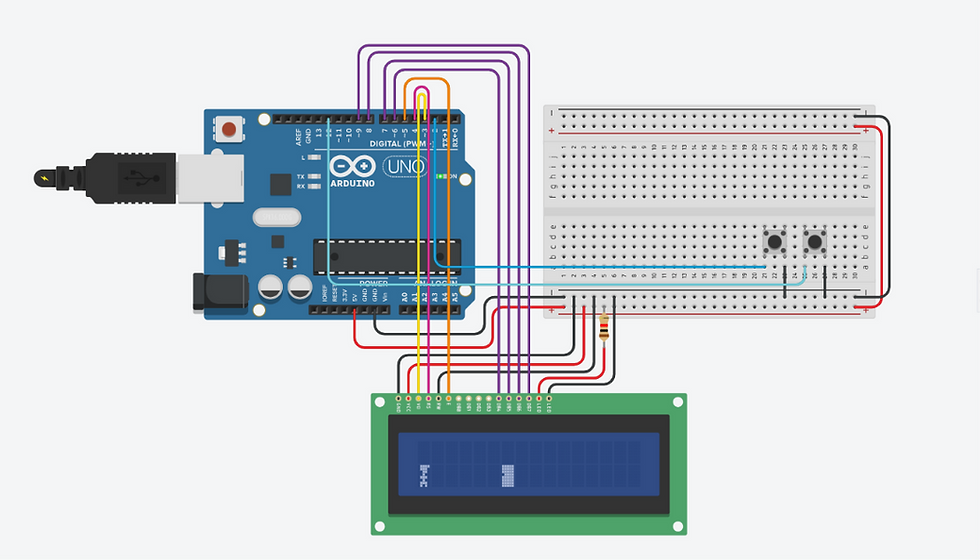
The circuit is built around an Arduino UNO, which serves as the main controller for the game. A 16×2 LCD is interfaced with the Arduino in 4-bit mode using the LiquidCrystal library, allowing the display of both text and custom characters while reducing the number of digital I/O pins required.

Two push buttons are connected to the Arduino to control the player's movement between the upper and lower rows of the LCD. A current-limiting resistor is used in the circuit, and all the components are assembled on a breadboard using jumper wires to create a simple and organized hardware setup.
Circuit Connections
Component | Arduino Connection | Purpose |
LCD RS | Digital Pin 4 | Selects whether the LCD receives a command or displays data. |
LCD Enable (E) | Digital Pin 5 | Enables communication between the Arduino and the LCD. |
LCD Data Pin D4 | Digital Pin 6 | Transfers data to the LCD in 4-bit mode. |
LCD Data Pin D5 | Digital Pin 7 | Transfers data to the LCD in 4-bit mode. |
LCD Data Pin D6 | Digital Pin 8 | Transfers data to the LCD in 4-bit mode. |
LCD Data Pin D7 | Digital Pin 9 | Transfers data to the LCD in 4-bit mode. |
LCD GND | GND | Provides ground reference for the LCD. |
LCD VCC | 5V | Powers the LCD module. |
LCD RW | GND | Keeps the LCD in write mode. |
LCD LED+ | 5V through a 1 kΩ resistor | Powers the LCD backlight safely. |
LCD LED− | GND | Completes the backlight circuit. |
Push Button (UP) | Digital Pin 12 | Moves the player to the upper row. |
Push Button (DOWN) | Digital Pin 2 | Moves the player to the lower row. |
Working of the Connections
The Arduino UNO communicates with the 16×2 LCD using 4-bit mode, which requires only four data lines (D4–D7) along with the RS and Enable control pins. This configuration reduces the number of Arduino pins used while maintaining full control of the display.
The two push buttons are connected using the Arduino's internal pull-up resistors (INPUT_PULLUP). Under normal conditions, the input pins remain at a HIGH logic level. When a button is pressed, the corresponding pin is connected to ground, causing the input to become LOW. The Arduino detects this LOW signal and moves the player either upward or downward accordingly.
Working Principle
The Arduino UNO acts as the central controller of the game. When the circuit is powered on, it initializes the LCD display, configures the push buttons as input devices using the internal pull-up resistors, and displays a welcome message before starting the game.
After initialization, the player character is displayed on the left side of the LCD, while an obstacle is generated at the right side in a randomly selected row. The Arduino continuously monitors the two push buttons. Pressing the UP button moves the player to the upper row, while pressing the DOWN button moves the player to the lower row.
As the game runs, the obstacle moves from right to left across the LCD. Whenever an obstacle reaches the end of the display, a new obstacle is generated in a random row, the player's score is increased, and the obstacle movement speed is increased to make the game progressively more challenging.
The Arduino continuously compares the positions of the player and the obstacle. If both occupy the same row and column, a collision is detected. The LCD displays a "Game Over" message followed by the player's score, after which the game automatically restarts and begins a new round.
Source Code
The complete Arduino program for the LCD Endless Runner Game is provided below.
You can download the complete Arduino source code for this project using the download option provided below.
Code Explanation
Library Inclusion and Global Variable Declaration:
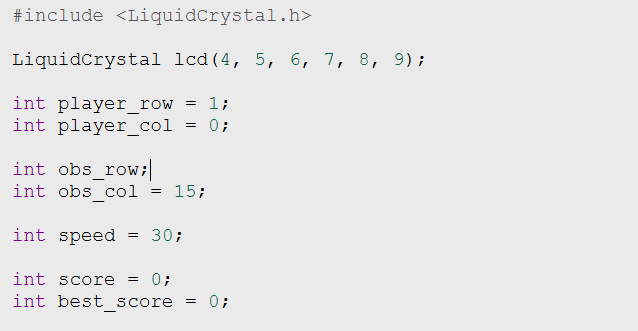
The program begins by including the LiquidCrystal library, which provides the functions required to interface the Arduino UNO with the 16×2 LCD display. An LCD object is then created by specifying the Arduino pins connected to the display in 4-bit mode.
The global variables are declared to store and manage the game's state throughout execution. The player_row and player_col variables represent the player's position on the LCD, while obs_row and obs_col store the obstacle's position. The speed variable controls the obstacle movement speed, and the score and best_score variables are used to keep track of the player's current score and highest score during gameplay.
setup() Function:

The setup() function is executed only once when the Arduino is powered on or reset. It initializes all the hardware and prepares the game before gameplay begins.
First, randomSeed() initializes the random number generator using an analog input, ensuring that the obstacle does not always start in the same position. The obstacle row is then selected randomly using the random() function.
Next, the push button pins are configured using the INPUT_PULLUP mode, allowing reliable detection of button presses without requiring external pull-up resistors. The LCD is initialized as a 16×2 display, and a "Welcome !" message is displayed for one second.
Finally, the game() function is called to display the initial game screen, and serial communication is started at a baud rate of 9600 bps for debugging purposes.
game() Function:

The game() function is responsible for drawing the game objects on the LCD screen. At the beginning of the function, the LCD is cleared to remove the previous frame before displaying the updated game state.
Two custom characters are then created using the createChar() function. The first character represents the player, while the second represents the obstacle. These characters are stored in the LCD's Character Generator RAM (CGRAM), allowing the display of custom graphics.
Finally, the player and obstacle are displayed at their respective row and column positions using the setCursor() and write() functions. This function is called repeatedly throughout the program to continuously refresh the display as the player moves and the obstacle advances.
obstacle() Function:

The obstacle() function controls the movement of the obstacle throughout the game. During each execution, the obstacle is shifted one column to the left, creating the illusion of continuous motion across the LCD display.
The updated game screen is then redrawn by calling the game() function. When the obstacle reaches the left end of the display, it is repositioned to the rightmost column, and its row is randomly selected using the random() function. At the same time, the player's score is increased, and the obstacle movement speed is gradually increased by reducing the delay value, making the game progressively more challenging. The movement speed is limited to prevent the game from becoming excessively fast.
check_game_over() Function:


The check_game_over() function continuously checks whether the player has collided with the obstacle by comparing their row and column positions. If both occupy the same location on the LCD, a collision is detected, and the game ends.
When a collision occurs, the LCD displays a blinking "GAME OVER" message followed by the player's score. A short restart animation is then shown before the game variables are reinitialized, allowing the player to begin a new game. The function also updates the highest score whenever the current score exceeds the previous best score.
Note: In the current implementation, the score variable is not reset when the game restarts. As a result, the score continues from the previous game instead of starting from zero. This behavior is present in the current implementation and can be corrected by resetting the score variable when restarting the game.
loop() Function:
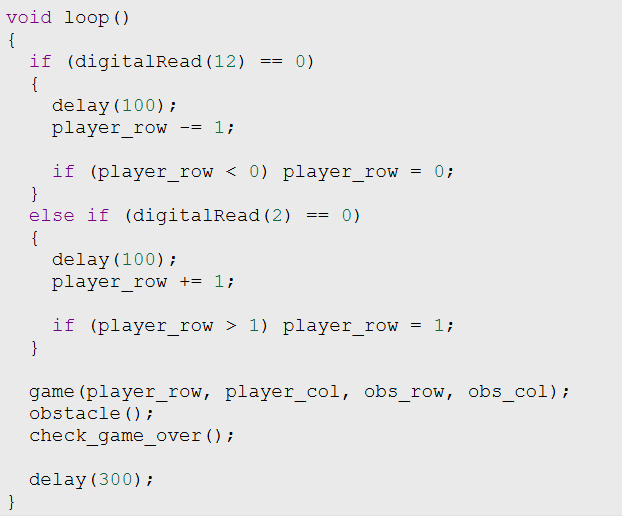
The loop() function is the main execution cycle of the program and runs continuously while the Arduino is powered. It first checks whether either of the push buttons has been pressed. Based on the detected input, the player's position is updated by moving the character to the upper or lower row while ensuring it remains within the LCD boundaries.
After processing the player's input, the function refreshes the game display, moves the obstacle, and checks for a collision. A short delay is added at the end of each iteration to maintain a smooth and consistent gameplay speed.
Simulation Output
The project was successfully simulated in Tinkercad, where all the game functionalities operated as expected. After the Arduino was powered on, the LCD displayed a "Welcome" message before starting the game. The player character could be moved between the upper and lower rows using the two push buttons, while obstacles continuously moved from right to left across the display.

The collision detection mechanism functioned correctly by identifying when the player and obstacle occupied the same position. Upon collision, the LCD displayed the "GAME OVER" message, followed by the player's score and a restart animation before beginning a new game.

The simulation confirmed the correct implementation of LCD interfacing, push-button input handling, obstacle movement, score tracking, and overall game logic.
Applications
Learning Arduino programming fundamentals through a simple interactive game.
Understanding LCD interfacing using the LiquidCrystal library.
Demonstrating embedded system concepts such as user input handling, collision detection, and real-time control.
Teaching game logic implementation using microcontrollers.
Mini projects for students, hobbyists, and Arduino beginners.
Embedded systems laboratory demonstrations and workshops.
Advantages
Simple and beginner-friendly project.
Uses inexpensive and easily available components.
Demonstrates multiple embedded programming concepts in a single project.
Improves understanding of LCD interfacing and push-button input handling.
Easily customizable with additional game features and difficulty levels.
Suitable for academic projects and learning embedded system development.
Future Improvements
The project can be enhanced in several ways to improve both gameplay and user experience:
Add multiple obstacle types with different movement patterns.
Display the highest score on the LCD after every game.
Include sound effects using a buzzer.
Introduce additional levels with increasing difficulty.
Add lives or health points instead of ending the game after a single collision.
Store the highest score in EEPROM so it is retained even after power is turned off.
Conclusion
The Arduino UNO based LCD Endless Runner Game demonstrates how a microcontroller can be used to create an interactive embedded application using simple hardware components. By combining a 16×2 LCD display, push buttons, and custom character generation, the project successfully implements player movement, obstacle generation, collision detection, score tracking, and automatic game restart.
This project provides an excellent platform for learning Arduino programming, LCD interfacing, random number generation, and real-time game logic. It can also serve as a foundation for developing more advanced embedded gaming applications with additional features and enhanced gameplay mechanics.
Comments